

Introduction
Ever completed a long form only to hit Submit and get an error that erases everything or blocks submission? We’ve all felt that frustration, and as front-end developers we want to spare our users the same pain. Multi-part (multi-step) forms solve the problem by breaking one large form into smaller, validated stages. A well-designed multi-part form must:
- Validate input at each step
- Let users move back and forth without losing progress
Most guides lean on extra form libraries, which add bundle size and complexity. Yet React Router v6/v7 already ships the tools we need—loaders, actions, <Outlet>, and outlet context—so we can build a multi-part form with zero third-party dependencies. In this article we’ll do exactly that.
Prerequisites & Tech Stack
This article is structured as a beginner-friendly tutorial you can follow step by step. However, you'll get the most out of it if you're already familiar with:
- Basic React (hooks, functional components)
- How React Router’s
loaderandactionfunctions work
| Tool | Version | Notes |
|---|---|---|
| React | 18.x/19.x | Hooks and Suspense support |
| React Router | v7 (framework mode) | Server loaders/actions |
| Vite (dev tool) | latest | Fast local builds |
| (You can reproduce the same project in SPA mode or in React Router v6 with minor tweaks—but they only provide client-side loaders/actions.) |
Core React Router APIs we’ll use
<Outlet>– renders the active child route- Outlet context – passes shared state to child routes (similar to React Context)
useSubmit()– imperatively post data to anaction
Project Scenario (What We’re Building & Why)
We will create a form to register a sale record for a beauty salon, with just two stages, to keep our examples as minimal as possible. The form is going to be divided into the following two parts:
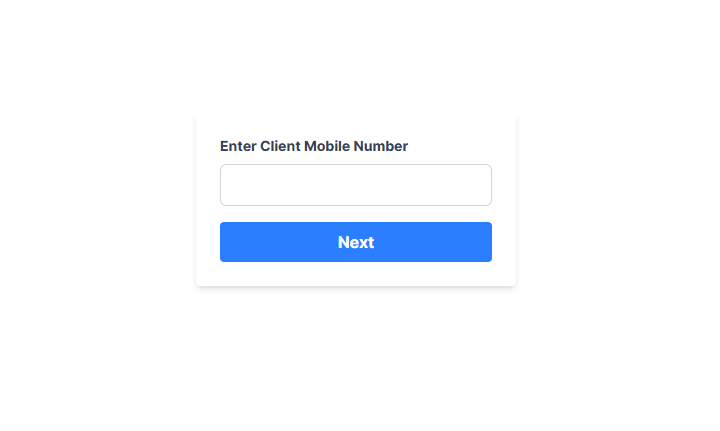
- Part 1: Entering the client's mobile number. This stage allows us to validate whether a client with the provided phone number exists within the database.
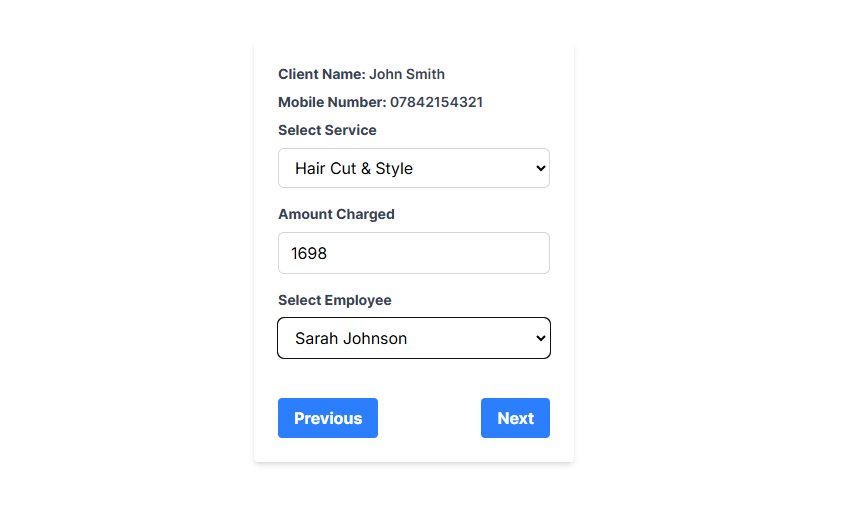
- Part 2: Entering the rest of the information, such as the service taken, the amount charged, and the employee who provided the service. The reason for dividing this form into two parts is that if a client doesn't exist in the database, the user is notified about that in the first stage, enabling them to register the client first instead of filling all the information in the form only to realize the client isn't registered in the system.
## 1. Project Setup
1.1 Clone the Starter / Finished Repo
Starter code If you'd like to follow along, you can use the project’s starter repo. All routes, route files, and utility functions are already set up, so you can focus entirely on implementing the multi-part form logic. {% embed https://github.com/Azfar731/multi_part_form_starter %}
2. Define the Routing Structure
2.1 Route Map Overview
To implement a multi-part form, we must structure the routes with a parent route that shares form state with its child routes, where each child route represents a stage of the form.
The route configuration for the app is defined in the /app/route.ts file. We will create the following routes
- / : root route(containing a single button for us to access form)
- /create_record: parent route containing all form stages as child routes
- index: the index route that gets displayed by default. This will be from part 1
- form_part2: This will contain form part 2
- /record: For displaying a single record of information(optional)
Our route.ts file will look like the following
//route.ts file
import { type RouteConfig, index, route } from "@react-router/dev/routes";

export default [
  index("routes/home.tsx"),
  route("/record", "routes/record.tsx"),
  route("/create_record", "routes/create_record/route.tsx", [
    index("routes/create_record/form_part1.tsx"),
    route("form_part2", "routes/create_record/form_part2.tsx"),
  ]),
] satisfies RouteConfig;
2.2 Create Route Files
Next, we need to create the files that the routes will translate to. A common convention is to place these files in the /app/routes directory.
The routes directory will have the following structure:
- Routes
- home.tsx (
/) - record.tsx(
/record) - create_record(Directory)
- route.tsx(
/create-record) => This will be the file within which child routes will be rendered - form_part1.tsx(
/create-record) => index route, containing form part 1 - form_part2.tsx(
/create-record/form_part2) => contains form part 2
- route.tsx(
- home.tsx (
3. Build the Multi-Part Form
Let's start building the main application.
3.1 Creating support files
The steps in this section have already been completed in the starter repo.
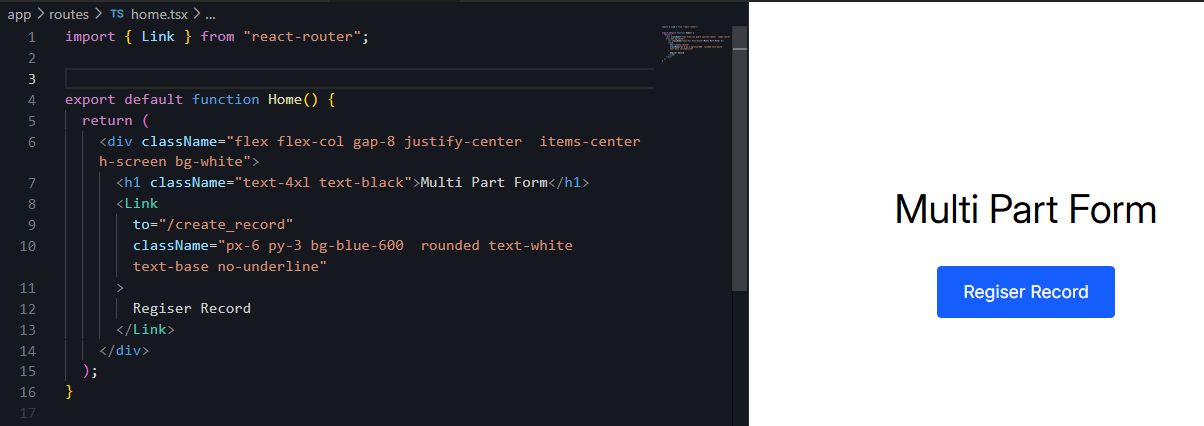
Creating root route
This will be a simple file(home.tsx) that only contains a link for us to navigate to our form.
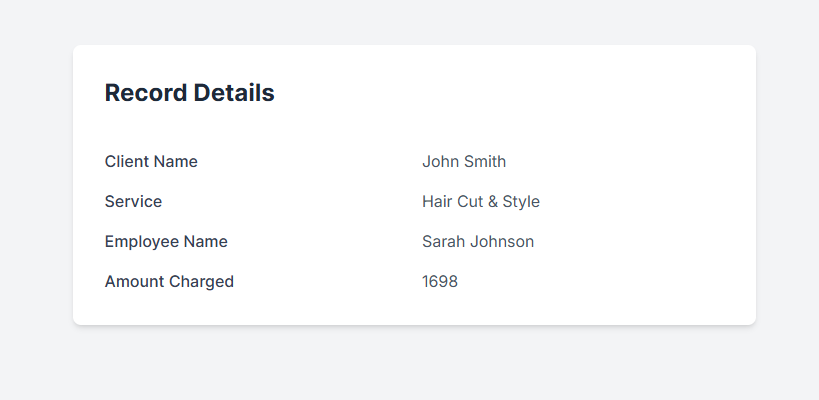
Displaying details of a Service Record:
This route is used to display the properties of a record.
Creating DB
Well, the heading here is a bit misleading, as for the sake of the tutorial, we will not be using an actual DB, but pre-populate some json files instead. These files will store info about clients, services and employees.
Creating Utility functions
I placed the functions for interacting with the json files, inside the app/utils/functions.ts file.
3.2 Parent Route – Outlet & Shared State
3.2.1 Passing Context to Child Routes:
This file will serve as the source of truth for the child routes, meaning that the state that will be used to store the form's data will be declared in this route. The main component that will be utilised in this file is the Outlet. The Outlet component is used to specify where the child routes will render.
The form state will be passed to the child routes using the context parameter in the Outlet component. We will pass an object containing the following:
- formData: The current state
- setFormData: The function to update the state
import { useState } from "react";
import { Outlet } from "react-router";

export default function CreateSaleRecord() {
  const [formData, setFormData] = useState({
    amount_charged: 0,
    mobile_num: "",
    service: "",
    employee: "",
  });

  return (
    <div className="bg-white text-black flex flex-col items-center justify-center h-screen">
      <Outlet context={{ formData, setFormData }} />
    </div>
  );
}
3.3 Part 1 – Client Lookup Form:
The purpose of this file is the following:
- Prompt the user to enter the client's mobile number.
- Validate that a client with the provided mobile number exists within the DB.
3.3.1 Form UI
The first thing that we need to do is to access the state and the setter function passed to the child routes. Outlet Context allows us to access the parameters passed through Outlet.
import { useOutletContext } from "react-router";
import type { FormType } from "~/utils/types"; //custom defined type for the formData state variable

export default function Form_Part1() {

  const { formData, setFormData } = useOutletContext<{
    formData: FormType;
    setFormData: React.Dispatch<React.SetStateAction<FormType>>;
  }>();

	return(
		//... form
	)
  }
Now let's define a form with a single input field for a mobile number. We’ll use formData.mobile_num to control this input field.
export default function Form_Part1() {

  const { formData, setFormData } = useOutletContext<{
    formData: FormType;
    setFormData: React.Dispatch<React.SetStateAction<FormType>>;
  }>();

  return (
    <div className="flex justify-center items-center min-h-screen">
      <Form
        method="post"
        className="bg-white p-6 rounded shadow-md w-80"
      >
        <label
          htmlFor="mobile_num"
          className="block text-gray-700 text-sm font-bold mb-2"
        >
          Enter Client Mobile Number
        </label>
        <input
          type="text"
          id="mobile_num"
          name="mobile_num"
          pattern="[0-9]*"
          defaultValue={formData.mobile_num}
          onChange={(e) =>
            setFormData((prev) => ({
              ...prev,
              mobile_num: e.target.value,
            }))
          }
          className="w-full px-3 py-2 border border-gray-300 rounded-md mb-4"
          required
        />

        <button
          type="submit"
          className="w-full bg-blue-500 hover:bg-blue-700 text-white font-bold py-2 px-4 rounded "
        >
          Next
        </button>
      </Form>
    </div>
  );
}
3.3.2 action Validation & Redirect
We have defined the form, and the first objective of the file is complete. But what happens when we click Next? For this purpose, we have to define React-Router's server action function, which will help us validate the input.
Here's how the action function will work:
- Access submitted form data.
- Check whether a client exists against the submitted mobile number
- If the client exists, redirect the user to the second part of the form.
- If the client doesn't exist, return a message indicating that a client with the provided mobile number doesn't exist in the DB.
import {
  redirect
  type ActionFunctionArgs
} from "react-router";
import { getClientbyMobileNumber } from "~/utils/functions";

export async function action({ request }: ActionFunctionArgs) {
  const formData = await request.formData();
  const mobile_num = formData.get("mobile_num")?.toString() || "";
  if (!mobile_num) {
    return { error: "No mobile number received" };
  }

  // Fetch the client
  const client = await getClientbyMobileNumber(mobile_num);
  if (!client) {
    return { error: `No client with mobile number: ${mobile_num} found` };
  }

  const redirectUrl = `form_part2?mobile_num=${encodeURIComponent(mobile_num)}`;
  //redirect user to the second part of the form
  throw redirect(redirectUrl);
}
The complete form_part1.tsx file:
import {
  Form, replace, useActionData,
  useOutletContext,
  type ActionFunctionArgs
} from "react-router";
import type { FormType } from "~/utils/types";
import { getClientbyMobileNumber } from "~/utils/functions";

export async function action({ request }: ActionFunctionArgs) {
  const formData = await request.formData();
  const mobile_num = formData.get("mobile_num")?.toString() || "";
  if (!mobile_num) {
    return { msg: "No mobile number received" };
  }

  // Fetch the client
  const client = await getClientbyMobileNumber(mobile_num);
  if (!client) {
    return { error: `No client with mobile number: ${mobile_num} found` };
  }

  const redirectUrl = `form_part2?mobile_num=${encodeURIComponent(mobile_num)}`;
  throw replace(redirectUrl);
}

export default function Form_Part1() {
  const actionData = useActionData<{ error: string }>();
  const { formData, setFormData } = useOutletContext<{
    formData: FormType;
    setFormData: React.Dispatch<React.SetStateAction<FormType>>;
  }>();

  return (
    <div className="flex justify-center items-center min-h-screen">
      <Form
        method="post"
        className="bg-white p-6 rounded shadow-md w-80"
      >
        <label
          htmlFor="mobile_num"
          className="block text-gray-700 text-sm font-bold mb-2"
        >
          Enter Client Mobile Number
        </label>
        <input
          type="text"
          id="mobile_num"
          name="mobile_num"
          pattern="[0-9]*"
          defaultValue={formData.mobile_num}
          onChange={(e) =>
            setFormData((prev) => ({
              ...prev,
              mobile_num: e.target.value,
            }))
          }
          className="w-full px-3 py-2 border border-gray-300 rounded-md mb-4"
          required
        />
        {actionData ? (
          <div className="text-red-700">{actionData.error}</div>
        ) : undefined}
        <button
          type="submit"
          className="w-full bg-blue-500 hover:bg-blue-700 text-white font-bold py-2 px-4 rounded"
        >
          Next
        </button>
      </Form>
    </div>
  );
}
3.4 Part 2 – Service Details Form
This file serves the following purposes:
- Use the loader function to fetch client details based on the mobile number in the search parameters. If the client doesn't exist in the database, redirect to Part 1 of the form. The loader then passes the fetched client object and any additional required data to the component.
- Collect user input through a Form.
- Submit the complete formData as a JSON object to the action function.
3.4.1 Fetching Data
In the loader function, we will access the search parameter through the request Web API. If the client exists, we proceed to fetch the services and employees from the DB and pass them to the component.
import { replace, type LoaderFunctionArgs } from "react-router"
import {
  createServiceRecord,
  getAllEmployees,
  getClientbyMobileNumber,
  getAllServices,
} from "~/utils/functions";


export async function loader({ request }: LoaderFunctionArgs) {
  const mobile_num = new URL(request.url).searchParams.get("mobile_num");
  if (!mobile_num) {
    throw replace(`/create_record`);
  }
  const client = getClientbyMobileNumber(mobile_num);
  if (!client) {
    throw replace(`/create_record`);
  }
  const services = await getAllServices();
  const employees = await getAllEmployees();
  return { client, services, employees };
}
3.4.2 Form UI
Just like in Form Part 1, we need to access the state and its setter using useOutletContext. This stage of the form includes the following fields:
- Service
- Employee
- Amount Charged
In addition to what we implemented earlier, we’ll introduce one more hook: useNavigate. This hook will be used to navigate back to the previous form when the user clicks the button.
const { client, services, employees } = loaderData;

  const { formData, setFormData } = useOutletContext<{

    formData: FormType;

    setFormData: React.Dispatch<React.SetStateAction<FormType>>;

  }>();

  const actionData = useActionData<{ error?: string }>();
  const navigate = useNavigate();

return (
    <Form
      method="post"
      className="bg-white p-6 rounded shadow-md w-80 text-black"
    >
      <div className="block text-gray-700 text-sm font-bold mb-2">
        Client Name:{" "}
        <span className="font-semibold">
          {`${client.first_name} ${client.last_name}`}
        </span>
      </div>
      <div className="block text-gray-700 text-sm font-bold mb-2">
        Mobile Number:{" "}
        <span className="font-semibold">{client.mobile_number}</span>
      </div>

      <label
        htmlFor="service"
        className="block text-gray-700 text-sm font-bold mb-2"
      >
        Select Service
      </label>
      <select
        name="service"
        id="service"
        required
        className="w-full px-3 py-2 border border-gray-300 rounded-md mb-4"
        value={formData.service}
        onChange={(e) =>
          setFormData((prev) => ({
            ...prev,
            service: e.target.value,
          }))
        }
      >
        <option value="">-- Select a Service --</option>
        {services.map((service) => (
          <option key={service.id} value={service.id}>
            {service.name}
          </option>
        ))}
      </select>

      <label
        htmlFor="amount_charged"
        className="block text-gray-700 text-sm font-bold mb-2"
      >
        Amount Charged
      </label>
      <input
        type="number"
        name="amount_charged"
        id="amount_charged"
        className="w-full px-3 py-2 border border-gray-300 rounded-md mb-4"
        min={0}
        required
        value={formData.amount_charged}
        onChange={(e) =>
          setFormData((prev) => ({
            ...prev,
            amount_charged: Number(e.target.value),
          }))
        }
      />

      <label
        htmlFor="employee"
        className="block text-gray-700 text-sm font-bold mb-2"
      >
        Select Employee
      </label>
      <select
        name="employee"
        id="employee"
        required
        className="w-full px-3 py-2 border border-gray-300 rounded-md mb-4"
        value={formData.employee}
        onChange={(e) =>
          setFormData((prev) => ({
            ...prev,
            employee: e.target.value,
          }))
        }
      >
        <option value="">-- Select an Employee --</option>
        {employees.map((employee) => (
          <option key={employee.id} value={employee.id}>
            {employee.first_name} {employee.last_name}
          </option>
        ))}
      </select>
      {actionData?.error && (
        <div className="text-red-700">{actionData.error}</div>
      )}

      <div className="flex justify-between items-center mt-6">
        <button
          type="button"
          onClick={() => navigate(`/create_record`)}
          className="bg-blue-500 hover:bg-blue-700 text-white font-bold py-2 px-4 rounded"
        >
          Previous
        </button>
        <button
          type="submit"
          className="bg-blue-500 hover:bg-blue-700 text-white font-bold py-2 px-4 rounded disabled:bg-gray-400 disabled:cursor-not-allowed"
        >
          Next
        </button>
      </div>
    </Form>
  );
}
3.4.3 Submit Entire Form with useSubmit
We’re almost done, but there’s one last step. Since a multi-part form doesn’t include fields from previous steps, we’ll submit the state variable instead—it holds all the required data.
To accomplish this, we’ll use the useSubmit hook, which enables sending data to the action function in different formats. In our case, we’ll use it to send data as JSON. The steps are as follows:
- Declare the
useSubmithook variable. - Define a
handleSubmitfunction for the form. - Inside
handleSubmit, use theuseSubmitvariable to send the data to the action function
Defining the useSubmit hook variable:
import { useSubmit } from "react-router"

export default function Form_Part2({loaderData}: Route.ComponentProps){
const submit = useSubmit()

//...rest of the code
}
Define the handleSubmit function for the form:
const handleSubmit = (e: React.FormEvent<HTMLFormElement>) => {
	e.preventDefault();
	submit(formData, { method: "post", encType: "application/json" });
};
return (
	<Form
	  method="post"
	  onSubmit={handleSubmit}
	  className="bg-white p-6 rounded shadow-md w-80 text-black">
	{/*...input fields*/}
	</Form>
)
We set the encType to application/json to submit the data in JSON format.
3.4.3 Accessing Data in action
All that is left is to define the action function.
export async function action({ request }: LoaderFunctionArgs) {
  const data = await request.json();
  const { mobile_num, service, amount_charged, employee } = data;

  //perform validation. Usually done through a library like zod or yup

  if (!service || !amount_charged || !employee || !mobile_num) {
    return { error: "All fields are required" };
  }

  //include other validations as needed. important to redo all validations done in previous steps too


  //for the sake of the tutorial, we are just going to pass the data to the `record` URL through search parameters instead of creating a record

  const params = new URLSearchParams({
    mobile_num,
    service,
    amount_charged: amount_charged.toString(),
    employee
  });
  const redirect_url = `/record?${params.toString()}`;
  console.log("redirect_url: ", redirect_url);
  throw replace(redirect_url)
}
So after a record is successfully created, it redirects the user to the /record URL.
Here is the complete form_part2.tsx file
import {
  Form,
  redirect,
  replace,
  useActionData,
  useNavigate,
  useOutletContext,
  useSubmit,
  type LoaderFunctionArgs,
} from "react-router";
import {
  createServiceRecord,
  getAllEmployees,
  getClientbyMobileNumber,
  getAllServices,
} from "~/utils/functions";
import type { Route } from "./+types/form_part2";
import type { FormType } from "~/utils/types";

export async function loader({ request }: LoaderFunctionArgs) {
  const mobile_num = new URL(request.url).searchParams.get("mobile_num");
  if (!mobile_num) {
    throw replace(`/create_record`);
  }
  const client = getClientbyMobileNumber(mobile_num);
  if (!client) {
    throw replace(`/create_record`);
  }
  const services = await getAllServices();
  const employees = await getAllEmployees();
  return { client, services, employees };
}

export async function action({ request }: LoaderFunctionArgs) {
  const data = await request.json();
  const { mobile_num, service, amount_charged, employee } = data;

  //perform validation. Usually done through a libarary like zod or yup

  if (!service || !amount_charged || !employee || !mobile_num) {
    return { error: "All fields are required" };
  }

  //include other validations as needed. important to redo all validations done in previous steps before creating a record in DB

  //create the record

  const params = new URLSearchParams({
    mobile_num,
    service,
    amount_charged: amount_charged.toString(),
    employee
  });
  const redirect_url = `/record?${params.toString()}`;
  console.log("redirect_url: ", redirect_url);
  throw replace(redirect_url)
}

export default function FormPart2({ loaderData }: Route.ComponentProps) {
  const { client, services, employees } = loaderData;
  const { formData, setFormData } = useOutletContext<{
    formData: FormType;
    setFormData: React.Dispatch<React.SetStateAction<FormType>>;
  }>();
  const actionData = useActionData<{ error: string }>();
  const navigate = useNavigate();
  const submit = useSubmit();

  const handleSubmit = (e: React.FormEvent<HTMLFormElement>) => {
    e.preventDefault();
    submit(formData, { method: "post", encType: "application/json" });
  };

  return (
    <Form
      method="post"
      onSubmit={handleSubmit}
      className="bg-white p-6 rounded shadow-md w-80 text-black"
    >
      <div className="block text-gray-700 text-sm font-bold mb-2">
        Client Name:{" "}
        <span className="font-semibold">
          {`${client.first_name} ${client.last_name}`}
        </span>
      </div>
      <div className="block text-gray-700 text-sm font-bold mb-2">
        Mobile Number:{" "}
        <span className="font-semibold">{client.mobile_number}</span>
      </div>

      <label
        htmlFor="service"
        className="block text-gray-700 text-sm font-bold mb-2"
      >
        Select Service
      </label>
      <select
        name="service"
        id="service"
        required
        className="w-full px-3 py-2 border border-gray-300 rounded-md mb-4"
        value={formData.service}
        onChange={(e) =>
          setFormData((prev) => ({
            ...prev,
            service: e.target.value,
          }))
        }
      >
        <option value="">-- Select a Service --</option>
        {services.map((service) => (
          <option key={service.id} value={service.id}>
            {service.name}
          </option>
        ))}
      </select>

      <label
        htmlFor="amount_charged"
        className="block text-gray-700 text-sm font-bold mb-2"
      >
        Amount Charged
      </label>
      <input
        type="number"
        name="amount_charged"
        id="amount_charged"
        className="w-full px-3 py-2 border border-gray-300 rounded-md mb-4"
        min={0}
        required
        value={formData.amount_charged}
        onChange={(e) =>
          setFormData((prev) => ({
            ...prev,
            amount_charged: Number(e.target.value),
          }))
        }
      />

      <label
        htmlFor="employee"
        className="block text-gray-700 text-sm font-bold mb-2"
      >
        Select Employee
      </label>
      <select
        name="employee"
        id="employee"
        required
        className="w-full px-3 py-2 border border-gray-300 rounded-md mb-4"
        value={formData.employee}
        onChange={(e) =>
          setFormData((prev) => ({
            ...prev,
            employee: e.target.value,
          }))
        }
      >
        <option value="">-- Select an Employee --</option>
        {employees.map((employee) => (
          <option key={employee.id} value={employee.id}>
            {employee.first_name} {employee.last_name}
          </option>
        ))}
      </select>
      {actionData?.error && (
        <div className="text-red-700">{actionData.error}</div>
      )}

      <div className="flex justify-between items-center mt-6">
        <button
          type="button"
          onClick={() => navigate(`/create_record`)}
          className="bg-blue-500 hover:bg-blue-700 text-white font-bold py-2 px-4 rounded"
        >
          Previous
        </button>
        <button
          type="submit"
          className="bg-blue-500 hover:bg-blue-700 text-white font-bold py-2 px-4 rounded disabled:bg-gray-400 disabled:cursor-not-allowed"
        >
          Next
        </button>
      </div>
    </Form>
  );
}
Conclusion:
In this article, we've successfully demonstrated how React Router v7 provides built-in capabilities to effortlessly create multi-part forms without relying on third-party libraries. By leveraging essential React Router APIs such as loaders, actions, <Outlet>, and outlet context, we've implemented form validation at each stage, seamless navigation between form steps, and efficient state management. This approach not only simplifies your codebase but also enhances performance by reducing dependencies. You can now confidently extend these concepts to build multi-step forms tailored to your application's needs.
Live Sandbox and Github Repository
Access the live StackBlitz demo and full GitHub repository here.
{% embed https://stackblitz.com/~/github.com/Azfar731/multi_part_form %}
{% embed https://github.com/Azfar731/multi_part_form %}
Feel free to drop any questions in the comments, and I'd love to hear your thoughts on this approach.
Further Reading / Related Documentation
Some of the following links direct to Remix documentation, as React-Router documentation is a bit incomplete